
Public address system is widely deployed in all kinds of collective occasions, such as air and rail terminals, large-scale shopping malls, sports stadium, etc. To meet the current demands for a unified communication system, public address system is preferred to be integrated with the telephony system to streamline operations and enhance efficiency.
Snom PA1 is a SIP bridge uniting the functions of a telephone with a high-performance digital amplifier for broadcasting announcements while upgrading digital/POTs systems into SIP-based ones. Yeastar has completed interoperability testing with Snom PA1, which is to say by integrating Snom PA1 and Yeastar S-Series VoIP PBX, our mutual customers will receive premium user experience with rich functionality from both Yeastar and Snom.
Snom PA1 can be registered as an extension of Yeastar S-Series VoIP PBX, just like a SIP phone, and take charge of relevant management. Supposed that the extension number for PA1 is 1000. Then PBX users can dial 1000 to make an announcement through the handset. Through such easy operation, Snom PA1 will broadcast the announcement with loud-speaker or headphone connected to it.
Achieve full compatibility by Configuring Identities on Snom PA1:
Snom PA1 supports up to four accounts (or identities, as they are called on Snom devices) that can be used to make announcements over the loudspeaker connected to the Snom PA1.
- Register PA1 on Yeastar S-Series PBX.
- Log in the web interface by using the IP of Snom PA1 obtained from DHCP Server.Try the default IP address: 192.168.0.2. if there is no DHCP service supported in the network.
- Change the IP address to ensure PA1 and PBX in the same segment of network.
- Once logging in the web interface, go to the menu on the left and click “Identity 1”. Then enter the required data of extension from Yeastar S-Series PBX into the “Login” tab display on the right of the page.
– Account: the extension number.
– Password: Password for your extension
– Registrar: the IP address of Yeastar S-Series PBX.
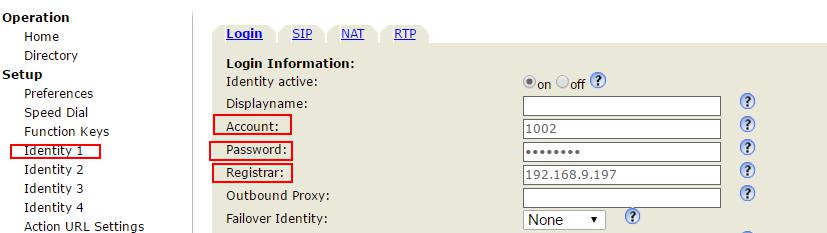
- Click “Apply” or “Re-Register”. And then click “Save” at the top of the page to make sure the change take effect.

If the registration has been successful, the red “Power” LED will turn off while the green “Call” LED will stay on, indicating that Snom PA1 is ready to receive announcements.
After the above configuration, Snom PA1 will work seamlessly with Yeastar S-Series PBX. Broadcasting through the connected speaker as well as making communications with the connected headphone are both made possible.
Know more details on how to how to integrate Snom PA1 with Yeastar S-Series VoIP PBX with the step-by-step configuration guide.
 Unified Communications

 Yeastar announced the Disaster Recovery solution for the P-Series Phone System, empowering enterprises with cross-region redundancy for uninterrupted communications in the face of disasters.
Will this work with the P-Series 570 and the P-Series Cloud?
Not supported yet. But it is on the roadmap.